

Reviewing Draft Vendors
Our system automatically finds new vendors and creates draft profiles for them. Before a draft goes live on the Vendor Portal for everyone to see, a person needs to double-check that the information is accurate and that the company belongs on our platform.
This reviewing can be done in the Draft Vendors Review Screen.
Golden Rules
Keep these core rules in mind before you start:
- You must set the Validation Status to
Accepted. Nothing is approved without this. - Only fix minor details — add a missing website link, fix a broken LinkedIn URL, or tidy up a clearly inaccurate description.
- Leave the categories alone. The system auto-fills tags like Market Role and Focus Area. Don't change them unless they are obviously wrong.
The 3-step Review Checklist
When you open a draft vendor, work through these three checks.
Step 1 — Check the website
The website is the anchor for all of the company's data.
- Click the primary website URL.
- Does it load? Does it actually belong to the company you are reviewing?
If the site is dead, parked, or belongs to a totally different business, reject the vendor.
Step 2 — Check LinkedIn and the description
We rely heavily on LinkedIn to pull in correct company data such as headcount and logos.
- Click the LinkedIn URL and make sure it points to the correct company. If it is missing or wrong, find and add the correct link.
- Read the company description. If it is missing or too generic, rewrite it briefly. If it already looks fine, leave it be.
Step 3 — Check the categories
Scroll and expand the Status & Classification panel. The system guesses these tags automatically — you just need to confirm they look roughly right based on what you saw on the website.
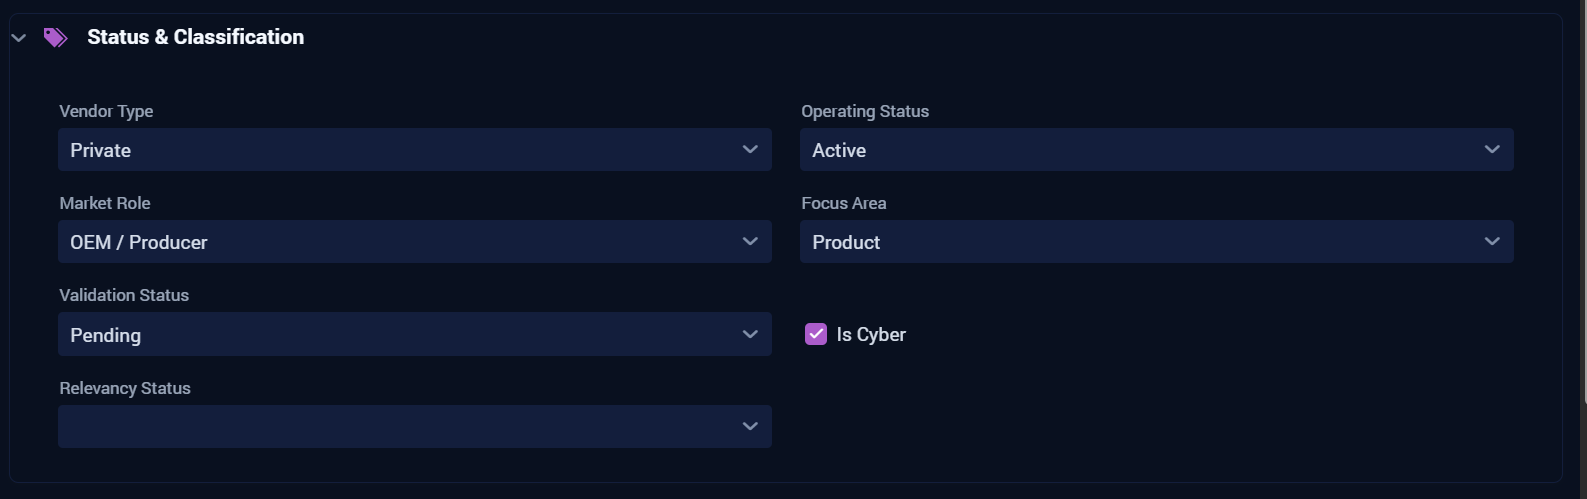
| Category | What it means | What we want to see |
|---|---|---|
| Is Cyber? | Are they a cybersecurity company? | A Tick (Yes). |
| Focus Area | Do they sell products, services, or both? | Usually Product or Hybrid. |
| Market Role | Are they the creator, a reseller, or an advisor? | Creators (OEMs), Resellers, or Distributors. |
| Operating Status | Are they still in business? | Active (avoid Retired). |
| Validation Status | Where are they in our review process? | Starts as Pending. Change to Accepted to approve. |
Final Decision: Approve or Reject?
Use this cheat sheet to decide whether a company belongs on the Vendor Portal.
Approve when they are:
- A cybersecurity company.
- Selling products (or a mix of products and services).
- The creators (OEMs), resellers, or distributors of those products.
- An active, open business.
Reject when they:
- Have nothing to do with cybersecurity.
- Are a services-only consulting or advisory firm — unless an exception applies (see Reviewing MNA Events).
- Are retired or out of business.
Finalizing your review
Once you've made your decision:
To approve
- Add any missing LinkedIn or website links.
- Set the Validation Status dropdown to
Accepted. - Save the latest changes by clicking
Save. - (Optional) Set a Priority if this vendor needs to be fast-tracked.
- Click Approve.
To reject
- Make sure you haven't edited any text or dropdowns.
- Click Reject.
What happens next
When you approve a vendor, they go live on the Vendor Portal and the system starts looking for their products to add.
Video guide
If you prefer learning by video, watch the draft vendor review walkthrough:
Feedback
This guide is a living document. If you spot gaps, unclear steps, or missing edge cases while using it, raise them with the Data Ops team so the guide can be updated